Friday, May 13, 2022

TCL Soundbar Not Working: How to Fix Common Technical Issues

tcl soundbar not working

Watching movies is made easy with soundbars because of their exceptional sound and compact build. However, they develop issues over time, and troubleshooting those problems isn’t the easiest because they have minimal controls. 

Fortunately, our technical team is here to help with these tried and tested fixes to common TCL soundbar issues. 

Issue #1: No Sound

What should you do if your soundbar suddenly stops producing any sound? Oftentimes, it only takes a few minutes to troubleshoot this technical issue. Here are our team’s quick fixes.

Check ARC (HDMI 1) on System Settings

If your soundbar is connected to a TV through an HDMI cable, there’s a possibility that the ARC settings under ‘(Control Other Devices) CEC’ hasn’t been activated. 
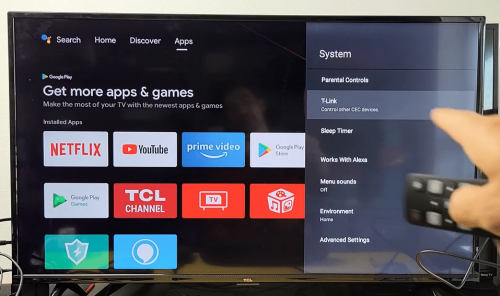
CEC devices system setting

To do this, you need to check if the HDMI cable is firmly connected to your TV. Then, click Settings on your TV, and select System. Check the ARC (HDMI 1) box among the options to enable your HDMI connection. 

Unplug Other Audio Devices

Other devices connected to the soundbar, such as game consoles, can interfere with the signals and sound. You should unplug such devices if they are not in use. Afterward, activate your soundbar and test it out.

Do a Hard Reset

A hard reset is different from a factory reset. The latter restores the device to its original settings, while a hard reset keeps the saved preferences. To perform a hard reset, turn off the soundbar, unplug the cables and plug them back in after twenty seconds. 

Try a Different HDMI Cable or Optical Cable

If the issue persists after trying out the steps above, our audio engineers suggest trying another compatible High-Speed HDMI or optical cable. The cable could be the problem, as it may be damaged or loose.

Issue #2: Unable to Control Soundbar Volume With the TV Remote

If you’re experiencing issues changing the soundbar volume with the TV remote, you may not have activated S/PDIF and ARC on the settings. To do this, follow these steps below: 
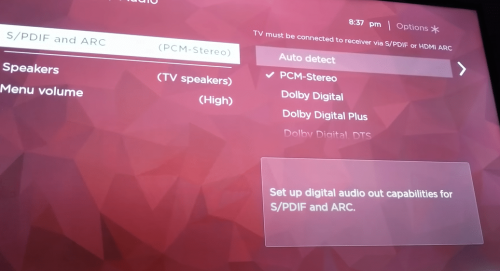
SPDIF and ARC TCL tv setting

Enable “S/PDIF and ARC” on System Settings

First, make sure that the HDMI cable is securely plugged into the TV’s HDMI ARC port. Then, select TV Settings > Systems > CEC Controls. Make sure it’s active. 

In Settings, enable TV speakers and set the S/PDIF and ARC to Auto Detect. It should make the remote work. 

Issue #3: Stuck on Standby

Is the TCL soundbar not working because it’s stuck on standby? The following steps might help you. 

Press the Power Button

Press the power button on the soundbar. Unplug it from the power source for some seconds and connect it back. 

Do a Hard Reset

Shut off the soundbar and unplug the cables from the power sources. Plug them back after twenty seconds. 
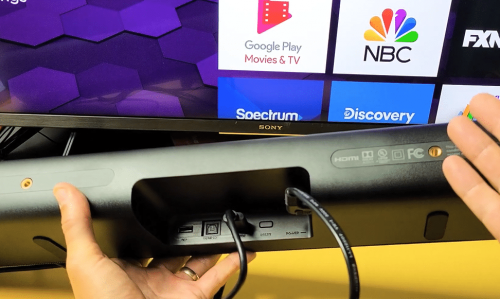
unplug tcl soundbar cables

Update Firmware

Most manufacturers try to fix soundbar glitches through updates. Check if there’s a new update available by going to the device’s setting or support section of the TCL website.

Factory Reset

Most times, doing a factory reset solves the problem. However, it will restore the soundbar’s default settings. So, everything you’ve saved will be wiped out. To perform this process;

Press and hold the Play/OK button for up to ten seconds. Wait until the factory reset option shows up. Press the Play/ OK button again to confirm the operation. The soundbar will reboot with an LED light blinking. 

Ensure the soundbar is correctly connected and that the front sidelight blinks before performing a factory reset. 

Issue #4: Soundbar and Subwoofer Not Working

If the soundbar and sub are not working, try the following solutions. 
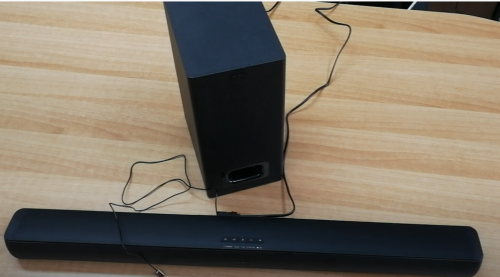
TCL Alto 7 on wooden table

Re-pair your Soundbar and Subwoofer

The devices could lose connection. It means you have to re-pair both devices. Plug both devices into a power source, hold the pair button on the sub for some seconds until it shows red, and finally, press down the power button on the soundbar until the lights flash. 

Plug Both Devices Into Another Power Source

Unplug both devices from the current source and plug their power cords into another electrical source. 

Check Cables for Damages

Once you spot any damage, notable folds, or scrapes on the connecting cable, replace it immediately or find an alternative wire. 

Do a Hard Reset

To do a hard reset of both devices, turn off the soundbar and sub, unplug their cables from the power sources, and plug them back in after ten to twenty seconds. 

Issue #5: Red Light

If the soundbar suddenly stops working and flashes a red light, it may be on standby mode. What you need to do is simply hold the power button to restart the soundbar again. If this doesn’t work, you can try the following:
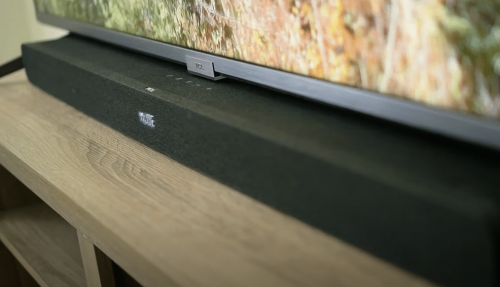
tcl soundbar on wooden surface

Increase the Soundbar Volume

If pressing the power button didn’t work and the red light remains stagnant, try increasing the soundbar’s volume. 

Try Using Another Power Source

If the red light remains lit, plug the soundbar into another power source. The power your soundbar receives from the outlet may be insufficient, which prompts it to standby mode.

FAQ

How do I reset my TCL soundbar?

You can reset your TCL soundbar by pressing down and holding the Play or OK button on the device’s remote for some seconds while on standby mode.

Conclusion

Most issues with the TCL soundbar not working or functioning properly can be fixed in a matter of minutes, but if the errors continue to persist, you might need to consult an expert or ask for help from the TCL support team. If your soundbar is still covered by the warranty [1], you can request a repair or replacement.

The post TCL Soundbar Not Working: How to Fix Common Technical Issues appeared first on The Product Analyst.


from The Product Analyst https://theproductanalyst.com/tcl-soundbar-not-working/

Thursday, May 12, 2022

Hisense TV Troubleshooting: How to Properly Troubleshoot Your Hisense TV’s Problems

hisense tv troubleshooting

How do you troubleshoot a Hisense TV? This mostly depends on the problems your Hisense TV is exhibiting. Whatever your concerns are, you will be glad to know that smart TVs like Hisense aren’t difficult to work with. 

Our technical team will show you 7 TV troubleshooting tips and tricks that will fix your Hisense TV problems quickly.

7 Hisense TV Troubleshooting Tips & Secrets

Issue #1: My Hisense TV Won't Turn On

“My TV won’t turn on” is by far one of the most common problems Hisense users face. Even though it’s a common problem, you can troubleshoot this issue in just a couple of steps:

  1. First, turn the TV off using the power button either on your remote control or the power button on the TV.
  2. Then, remove the power cable or power plug from the wall outlet and wait for 30 seconds before plugging it back in. This should be enough time for the system to shut down and reset again.
  3. While you’re counting down to 30 seconds, you might want to check your Hisense remote control as well. Take the batteries out, switch their spots, and put them back. 
Hisense R6090G Roku 4K

Most of the time with technology, the solution is easier than it seems. However, if none of those solutions work, you will need to Power Reset your TV using the default options.

  1. Go to the Main Menu option on your Hisense TV and go to the Settings menu.
  2. Select About.
  3. Select Restart.

But if the problem continues, your Hisense TV will need a Factory Reset.

How to Do a Factory Reset

If the other Hisense TV troubleshooting methods work but if some problems persist, your best and last resort to fix Hisense TV is to do a factory reset or a hard reset. This method will erase your TV’s current settings and will return to its factory default settings. You can do a factory reset by following these easy steps:

  1. Go to your TV menu and choose Settings.
  2. Find and select System.
  3. Open Advanced System Settings.
  4. Select Factory Reset.

Keep in mind that by doing this, you are erasing your current settings and any apps you have installed. Your TV will go back to its factory settings. So once the reset is finished, you will need to reinstall and sign in to all the apps again.

Issue #2: My Hisense TV Won't Respond to the Remote

We know how frustrating it is when your digital TV doesn’t respond to the remote control. The first instinct is to take the batteries out and switch them around. If you can’t remember the last time you changed the batteries, it’s probably time to change it. You may also want to unplug your TV as well. As a last option, a hard reset can fix this issue.

But if you’ve done all those steps and the TV still isn’t responding, you can do the following:

boy using a remote to control the TV
  1. Make sure the TV sensor is visible.
  2. If there’s an external source interfering source nearby, clear the area so it doesn’t interfere with the incoming signal.

You might be dealing with a damaged remote control and if that’s the case, it’s best to go to an authorized Hisense repair center to get it fixed or replaced.

Issue #3: Hisense TV Screen Keeps Flickering

If you have experienced or currently experiencing screen display issues such as flickering while using your Hisense Smart TV, don’t assume the worst.

Here’s what you can do:

  • Flickering may happen because of damaged or unsecured cables. Make sure the cables are securely connected to the TV. If they’re defective, replace them as soon as possible.
  • Try unplugging the power cord from the power supply and wall outlet, wait for 30 seconds to 1 minute then plug them in again.
  • Try plugging it in a different outlet.
  • Another cause of the flickering is anything interfering with your TV or cable box. It could be an electric device, an appliance, electric tools, etc.
  • Clear the area near your TV and if the flickering stops, then make sure it’s clear all the time.
Tv in Living room

Worst-case scenario, this may be an internal problem that can be fixed on the Hisense TV menu. You may have the Energy Saving mode turned on.

  1. Open your TV Settings.
  2. Select Picture and go to Picture Mode.
  3. Then you’ll see seven options.
  4. Go through those seven options and choose which setting will remove the flickering.

Note: If you want to keep the Energy Saving feature then you might want to consider doing a hard reset.

If none of these Hisense TV troubleshooting methods work, your TV may unfortunately have internal components that have malfunctioned. The safest and most reliable way to get it diagnosed is to go to an authorized repair center.

(Want to know how much energy your TV consumes? Well, you can check this page explaining how much wattage your television uses when turned on

Issue #4: What Do the Hisense TV Blinking Codes Mean

If your Hisense Smart TV is blinking non-stop, this may be a sign of a hardware problem. You can easily fix this issue by performing a power cycle:

  1. Press the power button on your remote control.
  2. Unplug the TV from the wall plug/ power source.
  3. Wait 30 seconds before you plug the power cord back in.
  4. Use the power button and turn the TV on.
Gray Screen

If the power cycle method doesn’t work, then it’s safe to say, your hardware issue needs to be looked into. We’re here to give you the ultimate run-down on what these blinking codes mean.If your red LED blinks:

  • Six times: the issue could be a defunct mainboard, inverter board, or power board.
  • Four times: the issue could be the main logic board or inverter board wires.

Once you understand what these blinking codes mean, you should contact the Hisense customer support team ASAP for further TV troubleshooting advice.

Issue #5: Pictures Appear But No Sound

We know how it can be a hassle when you’re ready to watch a movie but there’s no sound on your TV. If you are getting this issue, you can do the following:

  • Make sure your TV is not on Mute mode.
  • Check the input mode on your TV.
  • Check the volume settings and make sure it’s not set to Zero.

If your TV is connected to a Bluetooth speaker or any other external device, make sure it’s connected to the correct input. There might be a case where your TV is already connected to another device via Bluetooth.

If the sound still doesn’t work, you can fix this by performing a power cycle reset.

Issue #6: Why Did My Hisense TV Screen Turn Black?

The flickering screen is a common issue for smart or laser TVs’ blacklight to malfunction. But if the TV turns black? While it can seem daunting, it’s not hard to fix:

  1. First, turn off the TV and unplug it from the power source.
  2. Press and hold the power button for 20 seconds.
  3. After 20 seconds, keep the TV unplugged from the power supply for approximately 2 minutes before turning it on again.

Worst-case scenario, if the TV screen is still black, this is an indicator of a damaged mainboard, power board, or the LED display is malfunctioning.

Brightness Issue

Sometimes, if the TV turns black, you may have incorrect TV settings that’s causing your TV to appear black. But if you look closely, you can see a slight image. Try adjusting the brightness by pressing the Settings button.

Use the Right directional key on your remote and select Picture Mode. Normally, your smart TV will have presets for brightness and color that are fixed to match different conditions.

However, picture mode will allow you to tweak the picture settings and parameters to your liking and will ensure you won’t get a black and white picture.

flat screen tv

As a reference, you should follow these parameters:

  • Picture mode: theatre night
  • Backlight: 52
  • Brightness: 51
  • Color: 49
  • Color Space: Auto
  • Contrast: 47
  • Color Temperature: Low
  • HDMI 2.0 format: Enhanced
  • HDMI Dynamic Range: Auto

If this doesn’t fix the black screen, consider doing a factory reset, as this will allow your TV to go back to its factory settings.  If this problem persists, your backlight is malfunctioning and therefore needs to have its LED strips or LED light replaced.

(Planning to mount your TV to save more space? Well, here’s our tips about the ideal height for mounting a television at home) 

Issue #7: My Hisense Smart TV Doesn't Connect to the WiFi

Would it still be a smart TV if it didn’t connect to the internet? Of course not. Hisense smart TVs are not immune to this issue. But here are some ways to troubleshoot this.

First, you want to identify if the issue is from the TV or your network connection.

Network Connection Troubleshooting Methods

  1. Check if your WFi works on your mobile phones, computers, or any other smart device.

Your TV might not connect because congestion might be the cause. Disconnect one of those devices and try to connect the TV again. Make sure to get a WiFi router that has an external antenna and has a wide internal space for devices and applications that are network-heavy.

    2. Another solution is to reset the WiFi by unplugging the router from the power outlet, try a different AC outlet and wait for a minute or so until you plug it back in again.

tv screen

It sounds simple but ultimately, the solution may be as simple as making sure your TV and your wifi modem have the correct output connection and the correct input connection. If connectivity is still an issue after all that, you might want to contact your internet provider and have them take a look at your WiFi connection.

Hisense TV Connection Issue

If your Hisense TV still won’t connect, consider clearing the TV’s cache [1].

To do this, press the Home key and select Network. Select Clear Internet Memory. This will clear the cache. Reboot your TV and try connecting again.

(Considering other TV brands for your home theater? You can check these televisions made in the USA here

Conclusion

Based on this Hisense TV troubleshooting guide, you’re probably thinking that there are a lot of problems associated with a Hisense TV so maybe you should steer clear from them. Based on our technical experts’ experience, these are common problems you will face with other TV brands too.

Don’t let these common issues stop you from getting a Hisense Smart TV. They’re great, versatile, budget-friendly, and reliable! We have covered most of the Hisense TV problems and their quick-fix solutions. Hopefully, you can troubleshoot these problems comfortably now.

For more television guides and tricks, you can also check these pages below: 

The post Hisense TV Troubleshooting: How to Properly Troubleshoot Your Hisense TV’s Problems appeared first on The Product Analyst.


from The Product Analyst https://theproductanalyst.com/hisense-tv-troubleshooting/