Tuesday, June 28, 2022

How to Program 4-Digit GE Universal Remote Codes (Setup Guide)

4 digit ge universal remote codes

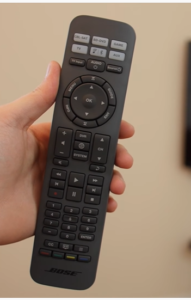
Having to deal with multiple remotes for different devices such as TVs, Blu-Ray players, and other home theater equipment can be a frustrating experience. With the GE Universal Remote, you can easily control your home theater devices singlehandedly.   

Programming the remote using the 4-digit GE universal remote codes is not as easy as it sounds, so set aside some time and let our tech team help you out to get it done. Let’s start!

About GE/Jasco Universal Remote Codes

The GE Jasco universal remote control can operate almost any type of audio and video device. To use the remote, you must enter the device-specific remote code of the device. This allows you to program the remote to operate different types of audio and video equipment, such as a TV, DVD player, stereo system, or CD player.

It comes with a simple and quick code search method and a manual entry method for pairing it with your electronic devices at home. But of course, before you start programming the GE Jasco remote, ensure that all the devices you want to connect are connected properly. 

person holding a GE remote

After that, make sure that the batteries are working properly. You should also note down the codes for the various components included in the remote. Having the wrong remote codes can be very frustrating after you have spent a lot of time programming the device.

How to Program GE Remotes With 4-Digit Codes Via Direct Code Entry

  1. Manually turn on the electronic device (DVD, TV, VCR, etc.) you desire to set up.
  2. Long-press the CODE SEARCH or SETUP button to operate the code search until the INDICATOR light turns on.
  3. You can program a device by releasing the button for your programming gadget. For AUX [1], press AUX and the device key you assign to AUX will be activated.
  4. To activate the GE Jasco Universal Remote, you must enter the three or four-digit code that you will use to activate it. After entering the code, you’ll see the light indicator turns off. 
  5. The remote should be pointed at the device, such as a TV, DVD player, or VCR. Tap the POWER key to power it off.

Via Auto Code Search (For Newer Models)

You can efficiently perform this procedure if you have a GE Universal remote that supports Auto-code search. Doing so will allow you to search for the exact remote code you need.

GE remote power button
  1. Power on the electronic device you want to program with your GE universal remote.
  2. Tap and hold the CODE SEARCH or SETUP button. The INDICATOR light should turn on after a few seconds, and the light will remain lit. 
  3. Tap AUX and the device button you are programming with your remote. Tap and release the device key you are programming (DVD, VRC, TV, etc.). 
  4. Press the POWER key, then release it until your electronic device powers off. NOTE: Hold the button for at least 2 seconds. You might have to press the power key many times to program it fully.
  5. You’ll see the indicator light will turn off. Tap the save button when the device is turned off, and the sleep feature will turn off your TV. The feature will switch off your TV at the specified time. 

Via Auto Code Search (For Older Models)

  1. Turn off the device you’d like to program.
  2. Long-press the SETUP or CODE SEARCH button until the indicator light powers on. It will flash once and then remains lit. 
  3. Long-press the device button you’re programming for about 2 seconds, then press POWER. The indicator will now turn on. 
  4. Lastly, press the ENTER/SAVE button to switch off your device. The feature will close your TV automatically when you select up to 99 minutes.

Other Code Search Instructions for Several Older GE Remotes

  1. Power on the electronic device you want your GE universal remote to be programmed with. 
  2. Long-press the SETUP key.
  3. Input the 9-9-1 three-digit code.
  4. Then, hold the POWER key on your remote and press the Channel up key until your device turns off. 
GE remote setup button

As per our tech team, you might take some time to find your key code, but it’s very important to do so before you can use your remote. After all, this will allow you to perform your device’s functions.

List of 4-Digit GE Remote Codes for TV Sets (LCD, Plasma, and Panel TVs)

  • Bell & Howell 0031 0049 0000 0001
  • Benq 0081 0083 0101
  • Bradford 0053
  • Broksonic 0147 0135 0250 0257 0310 0394
  • Brokwood 0004
  • Candle 0004 0009 0174 0008
  • Capehart 0175
  • Celera 0214
  • Celebrity 0002
  • Centrios 0169
  • Centurion 0009
  • Cetronic 0042
  • Changhong 0214 0401
  • Citizen 0004 0009 0053 0105 0109 0189 0135 0001 0008 0042 0058
  • Daewoo 0130 0004 0009 0100 0005 0138 0043 0140 0039 0252 0279 0444 0080 0042 0058 0017 0010 0126 0018 0127 0019
  • Daytron 0004 0009
  • Dell 0209 0028 0132
  • Diamond Vision 0210 0948 0092
  • Digistar 1019 0165 0118 0116 0167
  • Dimensia 0031 0000
  • Disney 0158
  • Dukane 0059 0072
  • Dumon 0121 0004
  • Durabrand 0189 0135 0157 0153 0254 0458 0217
  • Dynasty 0042
  • Elektra 0001
  • Electroband 0002 0014
  • Electrohome 0004 0009 0254 0003 0022
  • Elite Video 0197
  • Emerson 0004 0009 0044 0135 0049 0051 0189 0053 0147 0039 0130 0227 0233 0250 0252 0254 0257 0265 0266 0310 0325 0456 0040 0041 0042 0021 0023 0024 0179 0045 0025 0027 0030 0032 0034 0035 0037
  • Envision 0004 0009 0074
  • Fisher 0049 0110 0268 0180 0012
  • Fujitsu 0197 0051
  • Funai 0051 0189 0053 0227 0456 0042
  • Futuretec 0053 0042
  • Gateway 0046
  • Ge 0031 0107 0164 0004 0009 0044 0054 0000 0342 0003 0125 0015 0022 0052 0087
  • Gibralter 0121 0004
  • Goldstar 0004 0009 0005 0227 0338 0012 0057 0080 0156
  • Grundy 0051 0053
  • Guestvision 0201
  • Haier 0081 0216 0217 0157
  • Hallmark 0004 0009
  • Harvard 0053
  • Hitachi 0088 0059 0142 0060 0072 0004 0009 0091 0001 0012 0061 0137 0139 0141 0179 0227
  • Hisense 0073 0182 0216
  • Ilo 0198 1070 1024 1023
  • Ima 0053
  • Infinity 0062 0288
  • Initial 1070
  • Insignia 0103 0189 0217 0135 0133 0116 0167 0456 0029
  • Integra 0181
  • Inteq 0121
  • Janeil 0174
  • Jbl 0062
  • Jcb 0002
  • Jc Penney 0031 0004 0005 0009 0105 0107 0109 0054 0000 0087 0008 0012 0015 0022 0030 0052
  • Jensen 0004 0009 0133
  • Jvc 0060 0026 0197 0069 0247 0923 0012 0065 0067 0141
  • Kawasho 0004 0009 0002
  • Kaypani 0175
  • Kec 0042
  • Kenwood 0004 0009
  • Klh 0214
  • Kloss Novabeam 0068 0174
  • Konka 0053 0011 0016 0047 0066 0103 0412 0413 0029
  • Ktv 0053 0014 0021 0042 0070
  • Kurazai 0001
  • Lasonic 0210 0948
  • LG 0004 0050 0009 0005 0227 0338 0012 0057 0080 0156
  • Liquidvideo 0177 0168 0921
  • Lodgenet 0031 0202 0000 0001
  • Loewe 0211 0062
  • Logik 0031 0000 0001
  • Luce 0055
  • Luxman 0004 0009
  • LXI 0031 0004 0009 0049 0062 0107 0109 0000 0227 0015
  • Magnasonic 0051
  • Magnavox 0062 0004 0009 0456 0183 0226 0288 0008 0068 0075 0141
  • Majestic 0031 0000 0001
  • Marantz 0062 0181 0004 0009
  • Medion 0213 0198 0158
  • Megatron 0004 0009 0059
  • Mei 0014
  • Memorex 0004 0009 0049 0051 0135 0031 0000 0268 0310 0001
  • MGA 0004 0005 0009 0051 0012 0022 0141 0180
  • Midland 0031 0121 0054 0107 0015
  • Minutz 0052
  • Mitsubishi 0005 0151 0051 0004. 0009 0254 0022 0141 0180
  • Monivision 0036
  • Montgomery Ward 0031 0001 0000
  • Moteva 0049
  • Motorola 0020 0003
  • MTC 0004 0005 0009 0105 0109 0014
  • Multitech 0053
  • Multivision 0084
  • Myron & Davis 0212
  • NAD 0004 0009 0109 0185
  • NEC 0181 0004 0005 0009 0003 0010 0095 0141
  • Net TV 0046 0124
  • Nexxtech 1052 0167
  • Nikei 0042
  • Nikko 0004 0009 0058
  • Norcent 0216 0043 0056
  • NTC 0058
  • Olevia 1027
  • Oncommand 0201
  • Onking 0042
  • Onwa 0053 0042
  • Optimus 0170 0185 0374 0381
  • Optoma 1028
  • Optonica 0020 0095
  • Orion 0121 0135 0035
  • Panasonic 0171 0148 0054 0170 0062 0374 0381 0437 0950 0003 0070
  • Philco 0062 0004 0005 0009 0183 0068 0075 0141 0003 0008
  • Philips 0062 0204 0184 0208 0205 0206 0207 0004 0189 0183 0199 0200 0288 0456 0003 0008 0068 0075 0086 0087 0141
  • Philips-Magnavox 0062 0204 0207 0183 0226 0288
  • Pilot 0004
  • Pioneer 0185 0181 0072 0004 0009 0090 0179
  • Piva 1075
  • Polaroid 0182 0173 0133
  • Portland 0004 0005 0009 0058 0138 0130
  • Precision 0166
  • Price Club 0105
  • Prima 1019 0165 0116 0167
  • Princeton Graphics 0020 0099
  • Prism 0054
  • Proscan 0031 0107 0015 0000 0162 0163
  • Proton 0192 0004 0009 0093 0175 0186
  • Proview 1025 1026
  • Pulsar 0121 0004
  • Quasar 0171 0148 0054 0170 0062 0374 0381 0003 0070
  • Radio Shack 0031 0004 0048 0049 0053 0170 0009 0227 0342 0000 0012 0041 0042 0095
  • RCA 0031 0004 0048 0054 0094 0100 0102 0107 0129 0191 0005 0009 0000 0162 0163 0342 0003 0015 0022 0096 0113 0125 0179 0187 0188
  • Realistic 0031 0004 0048 0049 0053 0170 0009 0000 0227 0012 0041 0042 0095
  • Rhapsody 0014
  • Runco 0121 0181 0111
  • Sampo 0124 0046 0004 0009 0175 0012
  • Samsung 0105 0077 0076 0109 0007 0009 0004 0005 0085 0172 0942 0358 0012 0015 0080 0104 0106
  • Samsux 0009
  • Samtron 0105
  • Sansui 0135 0310
  • Santeca 0194
  • Sanyo 0049 0097 0110 0004 0268 0012 0108 0180
  • Scotch 0004 0009
  • Scott 0004 0009 0051 0053 0024 0035 0042
  • Sears 0031 0062 0049 0051 0105 0004 0009 0107 0109 0110 0189 0000 0112 0079 0394 0456 0012 0015 0180
  • Selectron 1022 1020 1021
  • Sharp 0079 0123 0063 0020 0004 0009 0226 0266 0006 0095 0122
  • Shogun 0004
  • Signature 0031 0000 0001 0023
  • Simpson 0008
  • Sonic 0014
  • Sony 0128 0013 0002 0071 0380
  • Soundesign 0004 0009 0051 0053 0008 0042
  • Spectravision 0203
  • Squareview 0189
  • SSS 0004 0053 0042
  • Starlite 0053
  • Star Sight 0064
  • Supra 0004 0082
  • Superscan 0112 0079 0456
  • Supersonic 0944
  • Supremacy 0174
  • Supreme 0002
  • SVA 0216
  • Sylvania 0062 0004 0009 0135 0189 0183 0227 0456 0008 0068 0075 0141 0161
  • Symphonic 0053 0189 0227 0456 0024
  • Syntax 1027
  • Tandy 0020
  • Tatung 0081 0198 0003
  • Technics 0054
  • Techwood 0004 0009 0054
  • Teknika 0031 0004 0005 0009 0051 0053 0105 0109 0170 0000 0174 0001 0008 0012 0042 0058
  • Telecaption 0117
  • Telerent 0031 0000 0001
  • Tera 0004 0186
  • Tevion 0198
  • TMK 0004 0009
  • Toshiba 0159 0178 0109 0120 0181 0105 0049 0095 0170 0260 0358 0394 0924 0012 0095 0117 0141
  • Trutech 1029
  • Universal 0052 0087
  • Victor 0060
  • Vidtech 0004 0005 0009
  • Viewsonic 0046 0072
  • Viking 0174
  • Vizio 0081
  • Wards 0031 0062 0004 0005 0009 0051 0000 0068 0075 0087 0095 0119 0052 0001 0008 0024
  • Westinghouse 0143 0114
  • White Westinghouse 0100 0130 0138 0136 0227 0279 0080
  • Yamaha 0170 0004 0005 0009
  • Zenith 0121 0009 0050 0078 0091 0138 0059 0131 0038 0111 0134. 0153 0064 0004 0135 0226 0227 0245 0247 0252 0266 0288 0310 0338 0358 0023 0058 0039 0001

Conclusion

Now you won’t have to deal with multiple remotes to control your electronic devices at home. By programming your 4-digit GE universal remotes codes with your TV, DVD, and other audio-video devices, you can fully relax by controlling them with just a single remote. 

Hopefully, our tech team resolved your concern, and have a wonderful entertainment time! 

The post How to Program 4-Digit GE Universal Remote Codes (Setup Guide) appeared first on The Product Analyst.


from The Product Analyst https://theproductanalyst.com/4-digit-ge-universal-remote-codes/

Thursday, June 23, 2022

How to Program Vizio Universal Remote Codes (A Setup Guide)

vizio universal remote codes

A Vizio universal remote is a perfect alternative in place of your your electronic devices’s remotes at home. However, you still need remote codes and the right programming steps to integrate the Vizio remote with your devices.

If you’re unsure how to program Vizio universal remote codes, our tech team provided simple methods of setting it up in this guide. 

How to Program a Vizio Universal Remote Without Codes

The following is the more straightforward method to program a Vizio universal remote without codes. 

  1. Tap on the POWER button of the TV you want to connect with.
  2. Long-press the LED button until the indicator light turns on.
  3. Tap on the TV key, and the indicator light should blink once and then turn on. 
  4. Tap the POWER key while pointing towards your TV.
  5. Stay in this position until your TV powers off. 
  6. Then, you can now press the ENTER button on your remote.  
Vizio Universal Remote power button

This time, the light will turn off, which means the program is successful. If not, you will need to go over the process again. Maybe you missed a step, or you didn’t follow the steps carefully. 

How to Program a Vizio Universal Remote Via Manual Method

When you buy the Vizio universal remote, it comes with a user manual or instruction manual stating the proper way and the codes needed to program the remote. You can try to refer to the user manual to resolve your programming concern. 

But, to make it convenient for you, we suggest following the direction below to program your Vizio universal remote.

  1. Turn on your TV manually or the device you want to control. 
  2. Press the TV button and long-press for about five seconds until you see the indicator light [1] blink twice. This time, the LED light should remain lit. 
  3. Search the programming code for your TV through the list of codes in the user manual. Using the NUMBER button, input the code, and the LED light should blink once every time you enter a digit. You will know the code is accepted when the LED light blinks twice after you enter the last number of the code, and the light will then turn off. 
  4. Point your Vizio universal remote to your TV or any device and press the POWER key. The setup is complete when your TV powers off. If not, start all over again using a different code. 
Pressing the channel buttons of the Vizio TV remote

Just note that if you use the right code, only then the programming will be successful. However, suppose the Vizio universal remote functions fail to operate. In that case, you will need to repeat the steps from the start using other codes given, depending on your TV (or other devices) brand. 

How to Program a Vizio Universal Remote Via Code Search

You could use the automatic code search feature to find the codes for your device if you were not able to find them online. This feature is included in all universal remotes, including Vizio universal remote controls. 

Here’s what you should do:

  1. Power on your TV (or any electronic device). 
  2. Tap the TV button once on your Vizio remote. 
  3. Long-press the TV and POWER buttons simultaneously, then release.
  4. Tap the PLAY key and release. 
  5. After you release the button, just wait for a few seconds to see if the TV will turn off. If it does not, follow the procedure again. The remote will then find the correct code for your TV.
  6. After the TV has powered off, press the REVERSE ARROW key and release. After about two seconds, the TV will power on. Press the STOP button then release.
  7. You can save the search code for the remote. After that, you can try different buttons on your TV to inspect its remote functionality.
Vizio V21-H8 Remote

Vizio 5-Digit Remote Codes

  • 10178
  • 10120
  • 10864
  • 10117
  • 10885
  • 11756
  • 01377

Vizio 3-Digit Remote Codes

  • 502
  • 505
  • 627
  • 004
  • 113
  • 011

Vizio 4-Digit Remote Codes​​

  • 1758
  • 1292
  • 0117
  • 1004
  • 1017
  • 1078
  • 0205
  • 0030
  • 0128
  • 0056
  • 0178
  • 1756

Vizio Audio Universal Remote Codes​​

  • 0600
  • 0883

Vizio DVD Universal Remote Codes​​

  • 1500
  • 1502
  • 1501
  • 1419
  • 0382

Vizio Wall-Mount Universal Remote Codes

  • 0320

Conclusion

With all the given steps above, you’re now ready to set up your universal remote using the right Vizio universal remote codes. You can now easily control your TV or other devices at home with a single remote control. 

Hopefully, our tech team has helped you learn the universal remote programming methods. If you follow the steps, then setting up your remote is as easy as 1-2-3!

The post How to Program Vizio Universal Remote Codes <br> (A Setup Guide) appeared first on The Product Analyst.


from The Product Analyst https://theproductanalyst.com/vizio-universal-remote-codes/

Thursday, June 16, 2022

How to Program a Universal Remote to a TV Without Codes

how to program a universal remote to a tv without codes

With a universal remote, you can control smart devices, video game consoles, computers, and more. But did you know that remote codes are not always necessary? It’s completely possible to program your universal remote without using codes. 

If all the codes confuse you, here’s how to program a universal remote to a TV without codes.

How to Program a Universal Remote Control Without The Use of Codes

Before you program your universal TV remote, make sure that your remote is functioning properly with full batteries. Also, check if your remote control is pointing towards the TV while programming. 

This is important because if the remote control and the TV are not connected, the remote programming process will have to be stopped.

setting up universal remote

You should also note that the programming options and steps for the universal remote may vary depending on the model and make of TV remotes.

Method #1

In programming your universal remote without a code, you’ll need to:

  1. Hold down the SET and Zero (0) buttons on your universal remote four times at the same time. This step is crucial, and this part is where most people fail. 
  2. You’ll then notice the LED light indicator (usually red) turns on steadily. Press the ON button intermittently and pause. Press and release (wait 1 second), then press and release again (wait 1 second). Repeat until your TV turns on.
  3. When you see your TV turned on, press the ENTER or OK button to confirm that this is the correct code. 

Method #2 (Auto-Scan) Method

If your remote doesn’t support the auto scan system, follow the steps below:

pressing set up button on remote
  1. Press the SET and the TV1 buttons simultaneously. 
  2. Once the red light turns on, press the SET button again, and the light should start blinking, asking for universal remote codes.  
  3. Then press the POWER button consecutively until your TV turns off.
  4. Make sure to do this operation slowly and follow the steps as-is. 
  5. When your TV is turned off, press the TV1 button to record the device code. 
  6. You’ll notice that the light will stop blinking and turn off, which means your remote control is now programmed.  

How to Find the Code for Your Universal Remote: 3 Methods

Method #1: Look for the Manufacturer's List

  1. Open the battery cover of your universal remote [1].
  2. In the battery compartment or cover, search for the model number of the remote.
  3. Search for the manufacturer’s website for the online instructions for the universal remotes.
  4. According to the instruction manual (or associated manual), list down the device codes or all possible codes you’ll need.
looking at remote's manufacturer's list

You’ll need to find their specific codes to make your universal remote compatible with your TV, multimedia centers, or multiple devices at home. 

Method #2: Find it on the Manual List

  1. Turn on your TV. 
  2. Press the TV button.
  3. Press and hold the SETUP button, and the remote light will blink twice, meaning it’s in learning mode. 
  4. Input the code from the manual that came with your remote.
  5. Press and hold the POWER button on your remote. With the remote control pointing towards your TV, wait until the latter switches off. 
  6. Release the button.

By now, you have successfully programmed your new universal remote with the use of the right code. But, if the functions still don’t work, go through the process again using the extra code (or several codes) given, depending on the TV brand. 

Method #3: Do an Auto Code Search

  1. Turn your TV on. 
  2. Using your remote, press the TV button.
  3. Press TV and POWER buttons at the same time, then release.
  4. Then press and release the PLAY button. 
tv button on universal remote

After releasing the button, wait a few seconds to see if the TV will turn off. If it does not, repeat the process until it turns off. The remote has found the right code for your TV.

After the TV has turned off, press and release the reverse arrow button until it turns back on. Finally, press the stop button and release. 

What to Do When the Remote Control Does Not Respond?

Before panicking, ensure your remote’s batteries are not dead or low. This could cause it to malfunction. 

It’s also possible that it has become deprogrammed, causing it to malfunction. You can replace the batteries or recharge them if necessary.

checking remote's battery

If you’re planning on getting a universal remote, you should consider its various features. One of these is its ability to program itself without the need for a remote code. 

This is because most of the popular remote brands in the US have built-in software that you can easily program and use.

What Can a Universal Remote Control Do?

Universal remotes, like the popular RCA remote models, can be used to control all your audio-video devices, regardless of their brand. 

There are many universal remotes that are a great alternative to replacing other branded remotes or consolidating multi-remote code lists. 

Bose Soundtouch 130 Remote

Benefits of a Universal Remote

A universal remote control is a great way to remotely control all your home entertainment devices using a single device. 

It simplifies the experience of watching TV by allowing you to switch between various systems at the same time. Its simplicity also allows you to keep track of all of your devices at the same time.

Conclusion

Universal remotes provide a practical resolution for operating any TV brand with a TV or DVD player or any other device at home. With the guide we provide above, you now know how to program a universal remote to a TV without codes. 

Also, our technicians have helped you find and provide model-specific codes for your TV. So try the steps above and enjoy watching TV without the hassle. 

The post How to Program a Universal Remote to a TV Without Codes appeared first on The Product Analyst.


from The Product Analyst https://theproductanalyst.com/how-to-program-a-universal-remote-to-a-tv-without-codes/

Monday, June 13, 2022

Sonos Ray vs Beam: Which Compact Soundbar is Better? (2022)

sonos ray vs beam

Are you searching for a better soundbar to complete your Sonos sound system? If so, we’re sure the Sonos Beam vs. Ray debate has already reached your ears. As you know, these Sonos soundbars are perfect for smaller setups. But what if you only have space for one? 

Intrigued by this issue, our team tested these two soundbars to see which model would reign supreme. 

Sonos Ray or Sonos Beam?

Budget Option
Sonos Ray
Sonos Ray
Editor’s Choice
Sonos Beam Gen 2
Sonos Beam (Gen 2)

Features of Sonos Ray and Sonos Beam

Design and Build

Both the Sonos Ray and Sonos Beam Gen 2 have space-saving and compact structures. Given their convenient design, it’s not surprising that these speakers are compatible with different accessories that allow wall-mounted and free-standing setups.

On top of that, these Sonos speakers have pretty identical measurements and dimensions, with Beam being only bigger by a few millimeters. 

But if we’re basing this on size, a Sonos Ray speaker can easily fulfill the audio needs of a 55-inch television. Meanwhile, if you’re dealing with larger TVs as wide as 65-inch, our team suggests going for a Sonos Beam soundbar. Anything bigger than these sizes calls for the use of Sonos Arc. 

Sonos Beam Gen 2 close up.jpg

Besides being a budget soundbar, the only design advantage Sonos Ray has over Beam in terms of design is its forward-facing drivers that don’t cause disruptions even when placed inside the TV cabinet. The Beam has a curved grille, so it must be placed in an open space. 

Moving on from exterior design, did you know that Sonos Beam and Sonos Ray also have a different number of speakers in their interior? 

Although Sonos Ray deals with an impressive build of two tweeters, four Class-D amp, and two mid-woofers, these components got nothing to Beam’s design. It’s got one center tweeter, four elliptical mid-woofers, five amplifiers, and three passive radiators. Because of this, the latter won this Sonos Beam Gen 2 vs. Ray comparison round.

Sound Quality and Performance

Sonos products are known to have wide soundstages, and Beam Gen 2 truly embodied that brand advantage. During our sound tests, it delivered a powerful audio production that filled the room. 

Sonos Ray Soundbar

It’s smaller than other soundbars, so don’t be surprised if it doesn’t produce an exceptional overhead audio quality. No worries, though. Arc is the only one out of the three soundbars that could achieve that sound. 

It’s also important to note that Sonos Ray’s sound isn’t comparable to the power Beam delivers. But despite not being immersive, these speakers provide a stereo effect that can make the high frequencies feel less enclosed. 

Due to the wide performance gap delivered by these soundbar options, this round of Ray vs. Sonos Beam still goes to the latter. 

Audio Modes

Although these speakers differ in sound process and performance, Ray and Beam offer the same audio modes. If you’re unfamiliar with these, it’s a set of sound enhancement features that elevate one’s audiovisual experience. 

Sonos Beam indicators

Users of these soundbars and other future brands from the company are guaranteed speech enhancement features that make the dialogues crisp while watching action-filled content. There’s also a night mode configuration where the speakers adjust to clearer sound quality even at lower volume levels. 

Given their similarity in this feature, we concluded that Beam Gen 2 and Ray are tied in this category. 

Audio Formats Supported (Dolby Digital or Dolby Atmos)

One of the crucial features only the Sonos Beam Gen 2 has in this comparison is the Dolby Atmos support. Thanks to this feature, it can deliver an immersive performance, just as we explained earlier. 

On top of Dolby Atmos, it supports the Dolby TrueHD format, multi-channel PCM, Dolby Digital Plus, and stereo PCM. 

Sonos Ray touch controls

Meanwhile, its soundbar counterpart has limited audio formats, like Dolby Digital 5.1, stereo PCM, and DTS Surround Audio. Sonos Ray undeniably lost this category because it has less audio compatibility. 

Surround Sound

If you’re playing Dolby Atmos content, Beam Gen 2 can deliver the 3D audio effect you want at ease compared to Sonos Ray. However, if you really want a room-filling surround sound, you may need to integrate a Sonos Sub into your soundbar. Through this, you can also get a deeper bass response.

Optical and HDMI Connections

When pitting Sonos Ray vs. Sonos Beam in terms of connections, the latter steals the spotlight with its HDMI ARC compatibility. Thanks to this feature, Beam can manage up to 32 audio channels. However, please note that this connection isn’t available in the original Beam model. 

input ports of Sonos Beam

This soundbar also features an optical port and HDMI CEC for other controls. You may not know, but an optical input is more typical in TVs than HDMI. As for Ray, it can only accommodate an optical connection and includes ethernet ports, which is a glaring disadvantage if you ask our tech-savvy team. 

Wireless Connectivity

Trust our audio expertise when we say that you don’t need the best tech tutorials to connect these soundbars to your existing theater system. Why? Because any recently released Sonos soundbar like these two offers Wi-Fi connectivity. 

Additionally, both models allow multi-channel connections, which means that your speakers can work with other devices in your theater system harmoniously and wirelessly. 

Sonos Ray below tv

These soundbars are also navigational through the Sonos mobile application, where you can switch audio modes as long as you’re connected to the unit’s network. Since the two have similar wireless connection features, both models get positive points in this round. 

Alexa and Google Assistance (Voice Control)

There are many benefits of having a voice assistant at home [1], but the ultimate premise is it’s an essential part of a modern home. Fortunately, Beam has smart assistant features and is compatible with programs like Google Assistant and Alexa. 

If you look closely, Sonos Ray doesn’t feature a built-in mic. It means that the unit isn’t available for any voice control feature and doesn’t fall into the smart speaker category. 

Price and Availability

If you look into the market just as we did, you can’t deny that Ray is a more affordable soundbar than Beam. With its lowered price tag, missing some crucial features like HDMI, Dolby Atmos support, and voice assistants are completely justified. However, it’s still a good product if you’re looking for reliable audio and compact design. 

function indicators of Sonos Beam

On the other hand, Beam’s price difference is understandable given its powerful performance and better audio format support. 

Overall Winner: Sonos Beam

Sonos Beam Gen 2 on wooden cabinet

At the end of the day, directly comparing Sonos Ray vs. Beam is the only way you can determine which model is better. And with all the smart features and audio formats Sonos Beam Gen 2 can handle, our resident audiophiles can assure you that this speaker won’t limit your audio needs and will elevate your listening experience. 

The post Sonos Ray vs Beam: Which Compact Soundbar is Better? (2022) appeared first on The Product Analyst.


from The Product Analyst https://theproductanalyst.com/sonos-ray-vs-beam/